Ferrero Rocher Cheesecake

img_2859

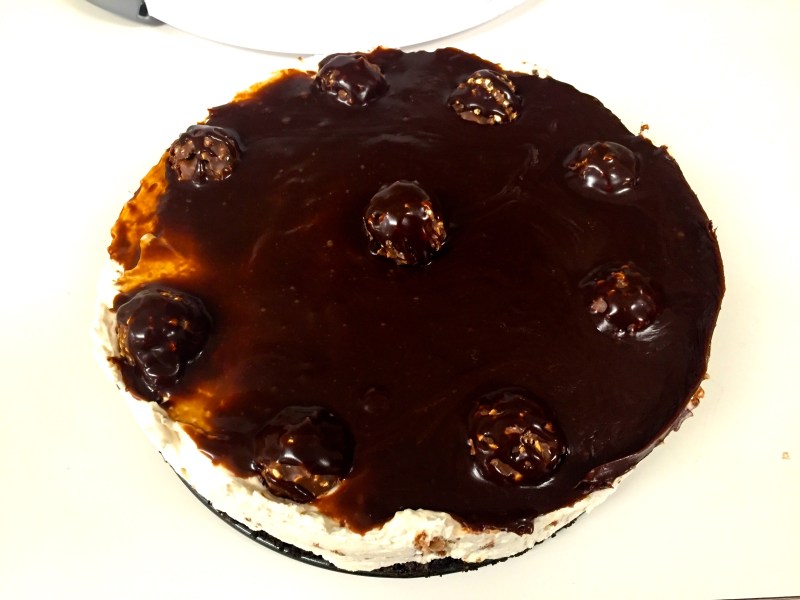
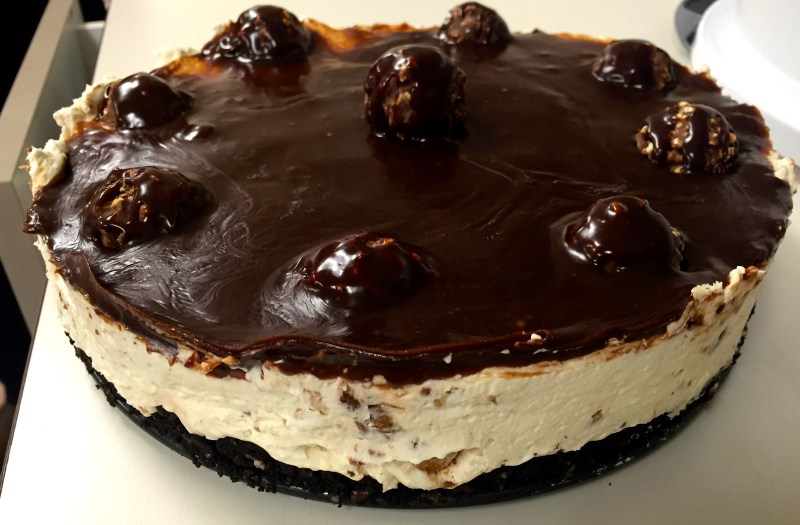
Now that the holidays are coming around, it is also time to start busting out the chocolates in case you haven’t already. You’ll see a lot of See’s chocolate boxes, but also a lot of Ferrero Rocher platters (or mountains if you’ve seen their most recent commercial). Ferrero Rochers are those hazelnut chocolate candies that nobody seems to dislike. So when thinking of a cheesecake, which I am a sucker for, what better thing to pair a hazelnut chocolate candy with than Nutella! This is also a no-bake cheesecake (well I guess that’s not true since you do bake the crust). But anyways, I found the recipe Ang Sarap, another blog, and I must say that it turned out pretty good. Although his was prettier…not going to lie.

Ingredients:

Crust
  • 2 cups crushed Oreos (I tried to scrape the frosting out (and eat it) as I found it made crushing them harder)
  • 3 tbsp unsalted butter, melted
Filling
  • ~16oz cream cheese, softened
  • ⅔ cup powdered sugar
  • 3 cups thickened cream or whipped cream, chilled
  • 4 tsp unflavored gelatin
  • 2 tbsp hot water
  • 6 pcs Ferrero Rocher, roughly chopped
Topping
  • 4 (ore more) tbsp Nutella
  • 3 tbsp milk
  • 2 tbsp powdered sugar
  • 8 pcs Ferrero Rocher
  • Chocolate shavings (optional)

Directions:

  1. Combine Oreos and melted butter, and press it in a 9 in pie pan, spread evenly and packed well
  2. Bake 350 degrees for 10 minutes
  3. Chill in fridge for around 20 minutes.
  4. Place softened cream cheese and sugar in a bowl together; mix with electric mixer until creamy.
  5. Dissolve gelatin in hot water then let it cool for a while. Add to the cream cheese mixture, continue to beat until mixture becomes fluffy.
  6. Add cream and 6 chopped Ferrero Rocher, then fold until it’s evenly mixed.
  7. Pour over the prepared crust.
  8. Top it with the Ferrero Rocher and chocolate shavings. Refrigerate for at least 6 hours
  9. Using a double boiler, mix the Nutella, powdered sugar and milk until runny (you may need to add more milk)
  10. Drizzle melted Nutella on top then serve
  11. Enjoy this wonderful dessert!

img_2857

Advertisement

White Chocolate Strawberry Mousse Cake

_DSC8090

Hello everyone! As I have said recently, I went on a sweet/dessert making “binge,” but because of that I have gained weight, which sucks.  Thus, I have definitely cut back on the amount of sugar I eat, but that doesn’t mean you can’t enjoy it every once in awhile. Thus, I bring you a no bake white chocolate strawberry mousse cake that I made a little while back. I got the recipe courtesy of Home Cooking Adventures. While the cake in their pictures comes out a lot prettier and even, mine still tasted good, so I’ll take solace in that lol. So indulge your sweet tooth, give it a try, and let me know how it goes!

Ingredients:

  • 9 oz crushed graham crackers
  • 6 oz melted butter
  • 7 oz white chocolate chips
  • 12 oz whipping cream
  • 1/2 tbsp gelatin powder
  • 2 tbsp cold water
  • 10 oz strawberries, hulled
  • 1/4 cup sugar
  • 1/2 tbsp gelatin powder
  • 2 tbsp cold water
  • 7 oz whipping cream
  • Fresh sliced strawberries, for decoration

_DSC8088

Directions:

  • Cut the 7 oz strawberries and place in a small saucepan with sugar over medium heat until sugar dissolves
  • Pour into a blender and puree
  • Dissolve 1/2 tbsp gelatin in 2 tbsp cold water and let it swell ~5min
  • Place gelatin in saucepan over low heat until it dissolves and then mix into strawberry puree
  • Let sauce cool to room temp
  • Place graham crackers into food processor and pulse until you have crumbs
  • Add the melted butter and process until fully combined
  • Push the crust into the bottom of a 8-9″ springform pan until covered
  • Refrigerate until needed
  • Dissolve gelatin in water and let swell for ~5 minutes
  • Add chocolate and 5 oz whipping cream and melt with double boiler
  • Again place swelled gelatin over low heat until dissolved and pour into white chocolate mixture and let cool
  • Whip the other 7 oz of whipping cream to stiff peaks and mix in the white chocolate mixture until well combined
  • Pour the chocolate mousse over the crust and refrigerate for ~20 min to let set
  • Whip the 7 oz whipping cream to stiff peaks and add the strawberry mixture until well combined
  • Pour over the set white chocolate mixture
  • Refrigerate 4 hours to overnight before serving
  • Use a knife (warm) to run around the edge of the pan before springing it open, then slice it up and go to town!

_DSC8089

Chocolate Tart with Raspberries

_DSC7805

At work we had a going away party for one of my supervisors who is moving on to bigger and better things (sad day). She wanted the link to this blog, and I gave it to her, so maybe she will see this.  If so, HI! Now she is a big desserts person, so my colleagues and I decided to make a few desserts for her. Of course my colleagues are big chocolate people and so is my supervisor. Now you know that I am not the biggest chocolate fan, but I sucked it up and made this anyways. I found it scrolling through my food network app on the way to the market and was able to find everything I need. Turns out its not THAT complicated and it tasted pretty good too for a guy who isn’t big on chocolate. The recipe worked out well, but I also thought I would decorate it more with some vanilla buttercream frosting and topped it with raspberries to complete it.

_DSC7806

Ingredients:

  • 2 cups all purpose flour
  • 5 tbsp sugar, separated
  • 1/2 tsp salt, separated
  • 3/4 cup unsalted butter, cold, cut into small cubes
  • 1 large egg, separated
  • 2 tbsp ice water, possibly more if necessary
  • 1 cup heavy cream
  • 1/2 cup milk
  • 10 oz semi-sweet chocolate, chopped (I used chips)
  • 2 large eggs @ room temp

_DSC7808

Instructions

  • For the dough, combine flour, 3 tbsp sugar, and 1/4 tsp salt in a large mixing bowl
  • Add the butter cubes and mix (i used my hands) until you have course crumbs
  • Combine 1 egg yolk with 2 tbsp ice water and blend together
  • Make a well at the bottom of the pastry bowl and add yolk/water mix
  • Blend the yolk mix with the dough (make sure not too wet or crumbly. If it is too crumbly, add 1 tbsp ice water)
  • Form dough into disk, wrap in plastic, and refrigerate for at least 30 min
  • Roll out the dough and place in tart pan, pressing firmly into all the ridges
  • Let it relax in the refrigerator for 15 min
  • Bake in oven at 350 degrees for 30 min (recipe says to use foil and pie weights, but I didn’t and it turned out fine)
  • Take out the crust, use the egg whites to wash, and rebake for ~7-8 min (make sure it doesn’t burn)
  • While the crust cools, make the filling
  • Heat heavy cream and milk in a pot over med-low heat, until simmering
  • Remove from heat and slowly stir in the chocolate making sure that it melts evenly and smoothly
  • Evenly stir in the 2 tbsp sugar and 1/4 tsp salt
  • Whisk the 2 room temp eggs and then incorporate them into the mix
  • Pour the chocolate into the cooled tart shell
  • Bake at 325 degrees for 18-20 min until the filling sets and the surface is glossy
  • Let the tart cool and set before cutting (I had to put mine in the fridge for ~15-20 min to help it set)
  • Decorate if you’d like, or just dive right in!

IMG_2536

Panna Cotta with Berries

DSC_0022

So, this post is about my sister’s panna cotta.  We had just had the prime rib from the previous post, and I tasked my sister with making a dessert for the evening. Due to an earlier conversation about panna cotta, she chose to try making them herself. Turns out, it is not difficult to make at all.  She got the recipe from the Food Network website and gave it a whirl.

Ingredients

  • 1 cup whole milk
  • 1 tablespoon unflavored powdered gelatin
  • 3 cups whipping cream (I don’t know if there is a difference between regular whipping cream and heavy, but I have only ever seen heavy whipping cream)
  • 1/3 cup honey
  • 1 tablespoon sugar
  • Pinch salt
  • Some berries

Instructions

  • Place the milk in a bowl and sprinkle the gelatin powder over it and let it rest for 5 minutes
  • Pour it into a saucepan and stir over medium heat, dissolving the gelatin, but making sure it doesn’t boil
  • Add the cream, honey, sugar, and salt
  • Stir until the sugar dissolves (~6 min)
  • Pour into glasses, or any container you desire, and let cool
  • Refrigerate to let it set for about 6 hours
  • Garnish with berries

DSC_0023

This turned out really well and it was tasty. It is definitely creamy and on the heavier side, but what good desserts aren’t?  We may try experimenting with different flavors of panna cotta in the future, but this is definitely an easy recipe to follow for a delicious dessert.