Vietnamese Grilled Pork Vermicelli

DSC_0013

So it was super hot today, which is crazy considering it was supposed to rain this past weekend.  Weather is weird. So since it was hot, I decided to make a fresher and cooler meal today.  I opted to make Vietnamese Vermicelli noodles with grilled pork, which is pretty easy to make.  I have made this particular dish before and I got the recipe awhile ago from here.

DSC_0006_2

Ingredients:

  • Pork butt
  • Fish sauce
  • Lettuce
  • Cilantro
  • Carrots
  • Cucumber
  • Garlic
  • Lemon
  • Pepper
  • Sugar
  • Chili Sauce

DSC_0005

Recipe:

  • Mix 5 tbsp fish sauce, 4 tbsp sugar, a lot of garlic, and pepper (I guesstimated how much fish sauce and sugar)
  • Let it marinate for ~30min+
  • Grill the pork (I used a pan because I don’t have a grill, and it still came out well)
  • Cook the vermicelli noodles
  • Shred the lettuce
  • Julienne the carrots
  • Chop the cucumber
  • Chop green onions and cilantro
  • Assemble your meal

Sauce:

  • 1/2 cup of water
  • 1/3 cup of fish sauce
  • Juice of a lemon
  • 1/4 cup sugar
  • Minced garlic
  • Small amount of Chili paste
  • Mix, add to the final dish, and enjoy!

DSC_0008

It’s Summer in San Francisco!

French Custard Froyo

This is a SMALL serving. SMALL! *Pardon my flaking nailpolish

It is RIDIC hot in San Francisco. Like 85 degrees. No joke. All the ladies came into work today with sleeveless sundresses on. After our weekly team lunch, I was suffering from a massive mexican food induced coma. Definitely didn’t help that I was resting on a nice leather couch by the window. I decided to venture outside since it was so freaking nice (and super rare!) to go and grab some froyo to wake me up. I came across Caffe Ambrosia while I was yelping for some frozen treats when I gave up ice cream for Lent. And man, this place is GOOD. It’s a pretty hole in the wall cafe and hard to spot since it’s literally in an alley. My go to flavor is the French Custard and I’ll usually add some toasted almonds and crushed up Oreos. Super simple treat and they give very, generous portions. The texture is super smooth and the taste is more like soft serve ice cream than you’re typical tartiness of other frozen yogurts. Tummy is happy.

Chicken Pesto Pasta

DSC_0031

Happy Monday! I was pretty surprised Nate was up to do another dish for the blog today. That’s 3 in a row! I was thinking once a week was going to be our average quota. Nate opted to do a noodle based dish today, so I persuaded him to do pasta!  Mostly because of my love for cheese and the fact that his basil plant was starting to wither. He forgot plants needed sun. After going on a quick run to Trader Joe’s after work, we were set to start cooking.

This is the recipe Nate used.

The Dish:  Chicken Pesto Pasta

DSC_0003

Ingredients:

  • A Couple of Chicken Breast
  • 2 cups of Basil (or all of his potted plant basically)
  • Cherry tomatoes
  • Heavy Cream
  • Pasta (we used linguine)
  • 1/2 Cup of Parmesan Cheese
  • 3 cloves of Garlic
  • Olive Oil
  • 1/3-1/2 cup of walnuts or pine nuts
  • Salt & Pepper

Steps

Pesto Sauce:

  • Add 1/3-1/2 cups of walnuts and 3 cloves of garlic to a food processor and pulse it a few times
  • Add the basil and pulse a few more times
  • Slowly add the 1/2 cup of EVOO and pulse a bit more (scraping off all the sides)
  • Add the 1/2 cup parmesan cheese and pulse it yet again
  • Add salt and pepper to taste

Pasta

  • Boil the water and salt it accordingly to cook your pasta
  • Heat the pesto in a pan with a little EVOO and stir it
  • Add as much cream as you deem necessary (We ended up adding more than we originally planned to thicken it, but it didn’t turn out super creamy)
  • Add some tomatoes
  • Salt and Pepper to taste
  • Add the pasta and mix thoroughly

Chicken

  • Salt and pepper
  • You can grill it or pan fry it (He used a pan, since he can’t have a grill at his apartment)
  • Cook throughly
  • Cut and enjoy!

Here is the final product!

After the two major fails (see below), Nate’s dish actually came out as a major success! He was very impressed with himself, which he claims is hard to do. Obviously, I added more parmesan cheese to my pasta. The pasta wasn’t as heavy as I expected which is how I prefer it. It was pretty light dish overall and I loved the nutty and crunchy texture of the pesto. We paired our pasta dish with a light side salad as well to balance out the heavy carbs.

Stay tuned tomorrow for our next noodle dish!

Cooking Fails

**Please don’t be as clumsy as we were


Braised Beef Shank

Hello.  I suppose that I will occasionally post about my own cooking and food, but no promises since I am pretty lazy.  This is the first of those times. Today was supposed to be cold, rainy, and all around crap, so I had planned to make something hot and comforting to balance that. Fortunately, the weather held up and it was a pretty nice day in the Bay. But alas, I already bought the ingredients for this braised beef dish, so what the hell, I made it anyways.  Nobody says you can’t have a hot dish on a warm day anyways, so whatever.

DSC_0099

The Dish:  Braised Beef Shank

Ingredients:

  • ~4 lbs Beef shank (sometimes I use short ribs)
  • Carrots
  • Celery
  • Onion
  • 2 cups White wine
  • 2 cups Marinara Sauce
  • 2 cups Chicken Broth
  • Salt and Pepper
  • Tomato Paste
  • Rice/potatoes

DSC_0052

Preparing the meal:

This is a recipe I got from my mom because I like this dish so much.  So thanks Mom!

  • Salt and pepper beef generously
  • Dice carrots, celery, and onions to desired thickness
  • Brown all sides of the beef shanks/short ribs in a pan (med-high heat)
  • Transfer the beef to a baking dish
  • Cook the celery, carrots, and onions in the meat juices from the browning (you may need to add a little bit of oil)
  • Add the 2 cups of chicken broth
  • Add the 2 cups of White Wine (remember, 1 for the dish, 1+ for you)
  • Add the 2 cups of marina sauce (You can make your own, but let’s be real, ain’t nobody got time for that.  Thus, I used store bought)
  • Mix the veggies and the broth and let it come to a boil
  • Pour the mix over the beef in the baking tray
  • Tent with foil and bake for 3 hours at 380 degrees
  • Add ~2 tbsp of tomato paste about half way to thicken the sauce a bit
  • Serve with rice/mashed potatoes/carbs – I used rice here because I am lazy and Asian

DSC_0086

Fried Kimchi Burger

Kimchee Burger

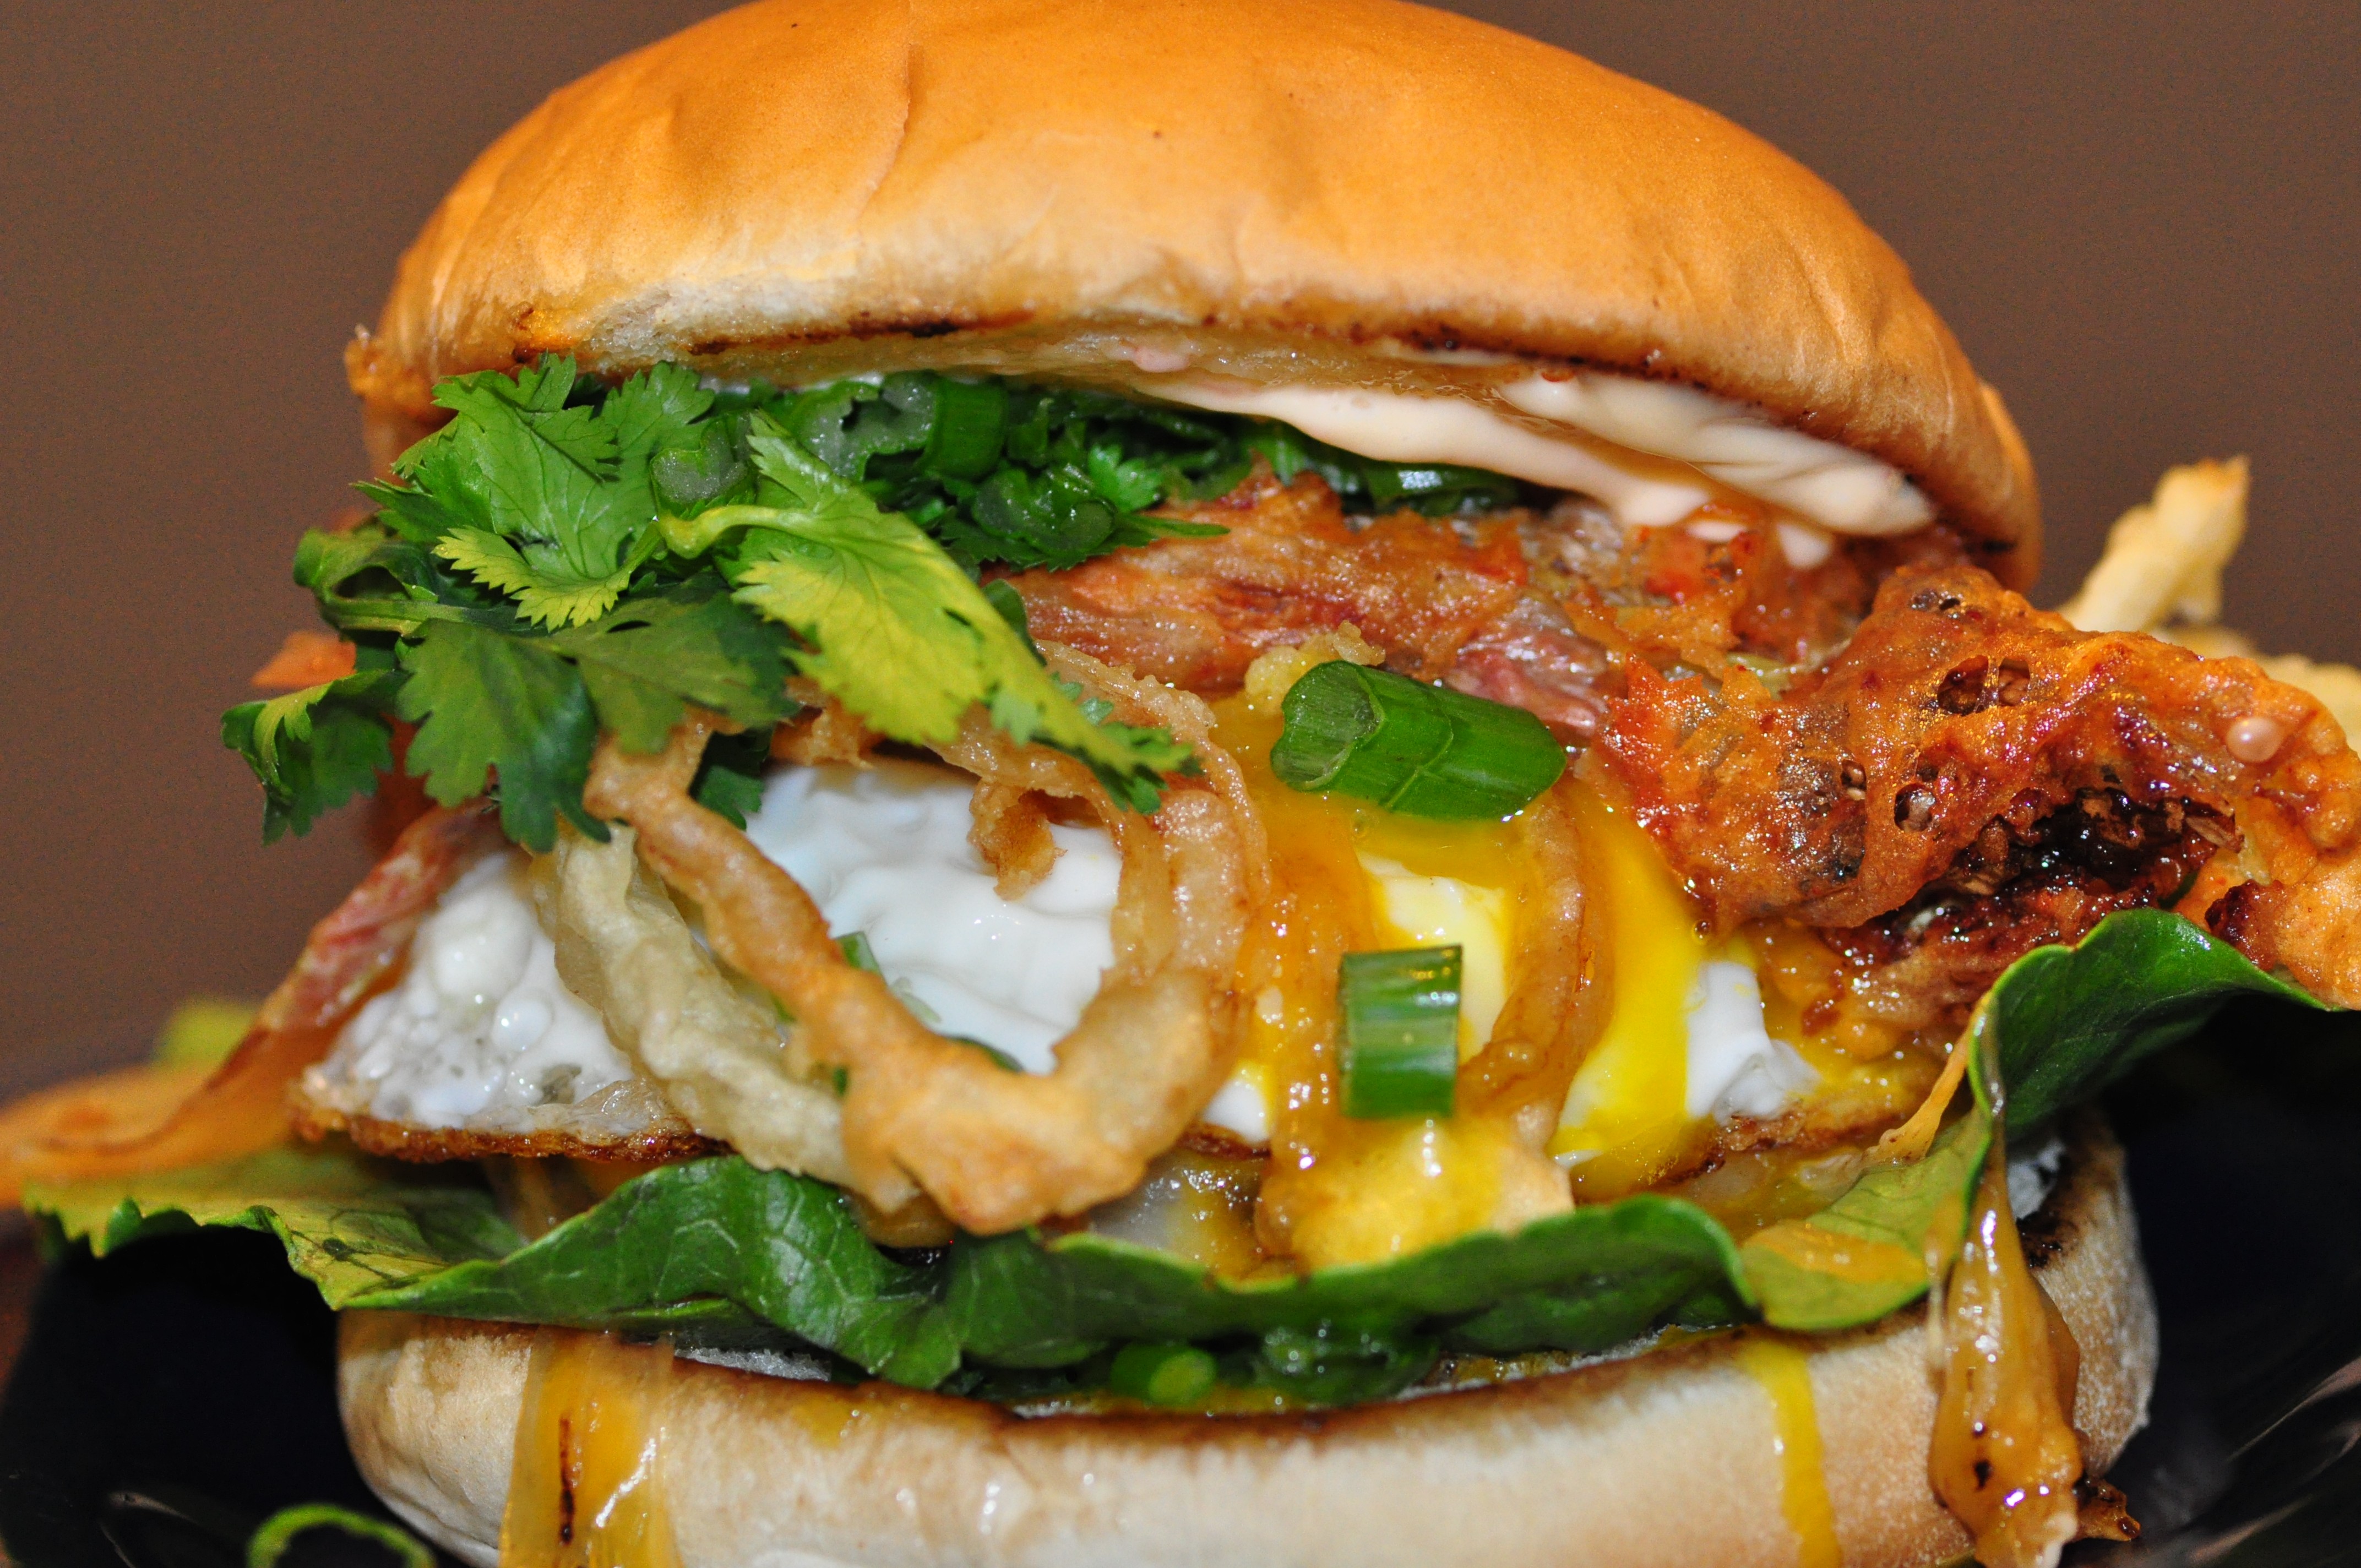
The Dish: Ground Beef Burger topped with deep fried kimchi, shoestring onion rings, egg, cilantro, green onions, cheese, and a spicy aioli.

Our first ever post! Hopefully we don’t disappoint. After drooling over PornBurger’s So Kalbi Maybe burger the day before, Nate was inspired to recreate his own version of it. We decided to forgo a private gala at the Cal Academy of Sciences, and instead, spend a night experimenting with this hunk of deliciousness. Nothing better than a fresh homemade burger topped with spicy kimchee, spicy aioli, and a runny egg on a rainy Friday night.

Please note that Nate made most these steps up while cooking. Try at your own risk.

Ingredients for Burger

  • 1.5 lbs of Ground Beef (Makes ~6 patties)
  • loose leaf lettuce
  • cheese as desired
  • kimchi
  • 1 brown onion
  • eggs
  • cilantro
  • green onions
  • salt
  • pepper
  • hot sauce (i.e. garlic chili sauce, sriracha, etc)
  • mayonaise
  • soy sauce
  • sesame oil

Preparing the Burger

*Disclaimer: measurements are all relative since Nate pretty much just guesses. Feel free to do the same according to your own taste buds.

  1. In a bowl, add ground beef, 2 tbsp hot sauce, 1/4 cup soy sauce, 2 tsp of sesame oil, salt and pepper to taste
  2. Mix well
  3. Form patties to your liking (remember that the patties shrink, which created a problem for one of them)
  4. Fry the patties to your liking – add cheese if you are into that
  5. Fry an egg to your liking, but I highly suggest letting it run a little
  6. Toast your buns (heh…)
  7. Assemble your burger with the onions, kimchi, and aioli (see below)
  8. Add a few chopped green onions and sprigs of cilantro to taste

Preparing the Batter for Fried Kimchi & Shoestring Onions

We used this recipe for the batter. Just dip the onions and kimchi in it and fry the shit out of them

Preparing the Spicy Aioli Sauce

Mix the mayo and some of the same hot sauce you used earlier (or different one, whatever you want) to taste.

DSC_0043

Mandatory Cut of the Burger

DSC_0045

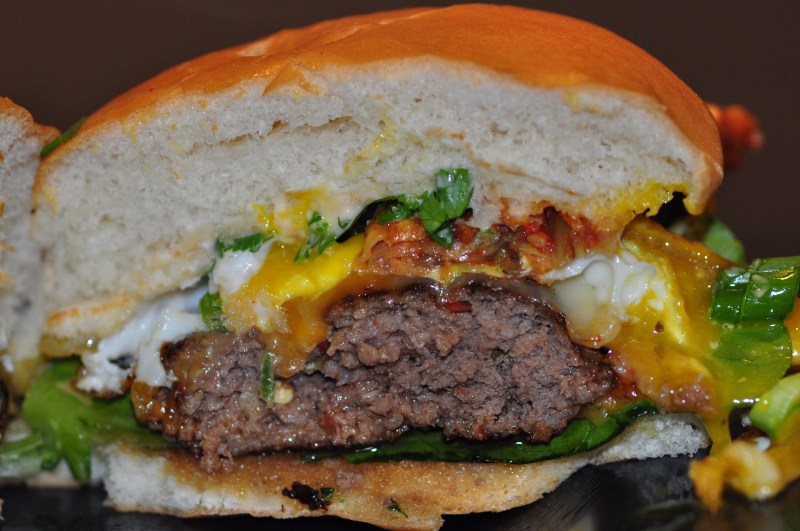
All in all, it was really good! A deceptively filling burger. Nate and I were fully satisfied after 1.