Baked Chicken with Cherry Tomatoes

_DSC7790

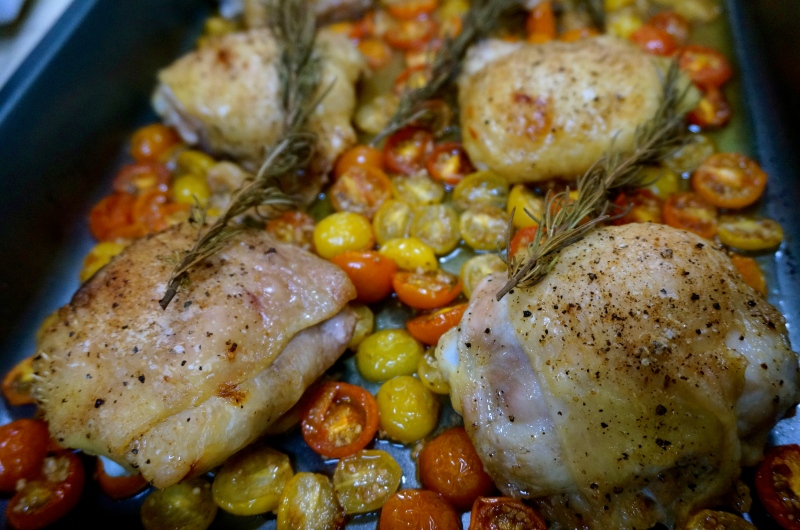
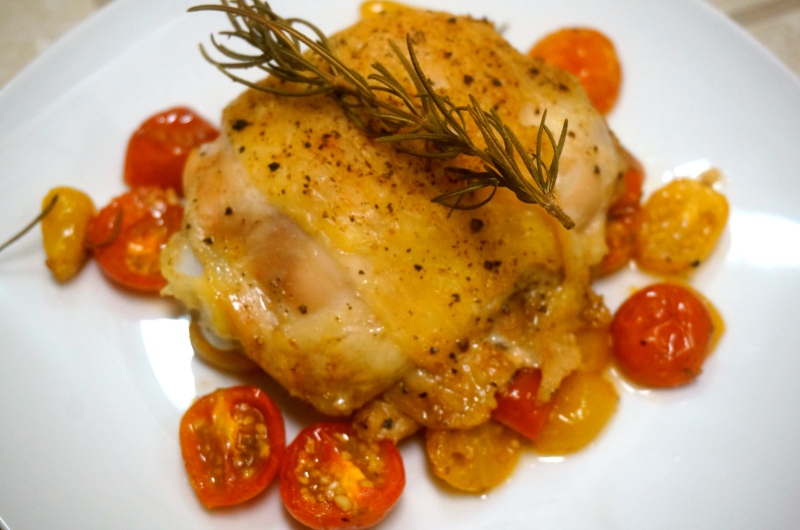
Fall is almost over, and we are headed into winter, but before we do, this is a really Fall dish I made.  It is really simple and doesn’t take that much time to be honest.  I think I have said this before, but I like chicken thighs because they are easy to bake and are more juicy and tender (not a breast fan). Also, I am kind of a sucker for the skin. I got the recipe just randomly browsing sites (not even really sure how I got there). In the end, I definitely enjoyed this one, but next time I probably won’t use as many cherry tomatoes, as it can get kind of pricey the more you use.

_DSC7776

Ingredients

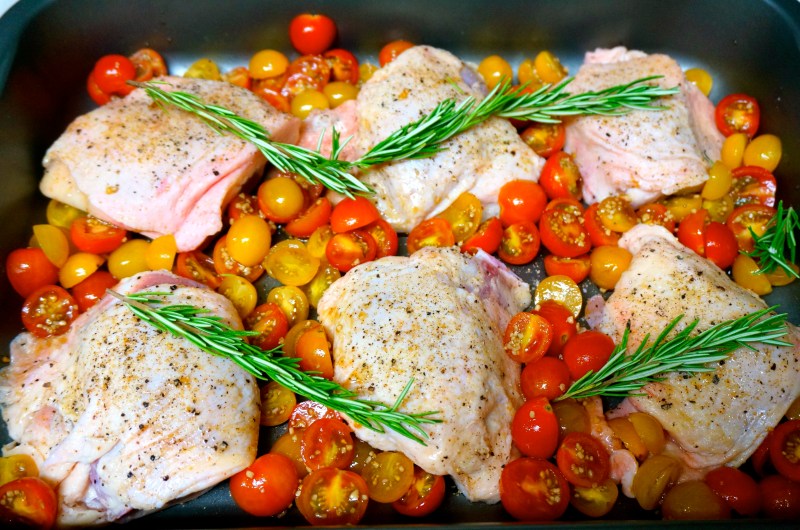
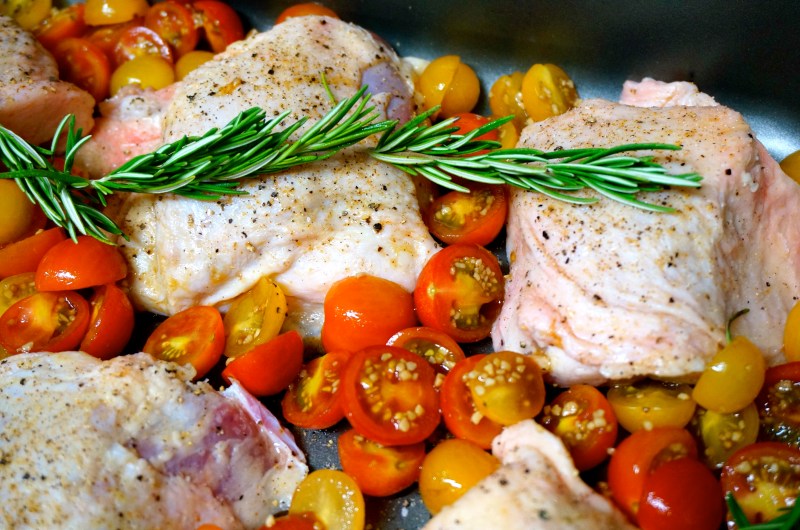
  • 2 pounds bone-in, skin-on chicken thighs
  • 1/2 teaspoon kosher salt
  • 2 cups of cherry tomatoes
  • 6 whole cloves garlic, peeled
  • 1 1/2 Tbsp balsamic vinegar
  • 1 1/2 teaspoons olive oil
  • 2 sprigs fresh rosemary

_DSC7778

Instructions

  • Sprinkle both sides of the thighs with salt and place in baking pan with some space in-between each thigh, skin side up
  • Cut the tomatoes in half and mix in a bowl with garlic, olive oil, and balsamic vinegar
  • Pour the tomatoes over the chicken pieces and arrange them so they fill the gaps between the thighs
  • Lay sprigs of rosemary over the tomatoes
  • Bake at 350 degrees for ~45 minutes
  • Skim excess fat/oil and serve with whatever you feel like
 _DSC7783
Advertisement

Chocolate Tart with Raspberries

_DSC7805

At work we had a going away party for one of my supervisors who is moving on to bigger and better things (sad day). She wanted the link to this blog, and I gave it to her, so maybe she will see this.  If so, HI! Now she is a big desserts person, so my colleagues and I decided to make a few desserts for her. Of course my colleagues are big chocolate people and so is my supervisor. Now you know that I am not the biggest chocolate fan, but I sucked it up and made this anyways. I found it scrolling through my food network app on the way to the market and was able to find everything I need. Turns out its not THAT complicated and it tasted pretty good too for a guy who isn’t big on chocolate. The recipe worked out well, but I also thought I would decorate it more with some vanilla buttercream frosting and topped it with raspberries to complete it.

_DSC7806

Ingredients:

  • 2 cups all purpose flour
  • 5 tbsp sugar, separated
  • 1/2 tsp salt, separated
  • 3/4 cup unsalted butter, cold, cut into small cubes
  • 1 large egg, separated
  • 2 tbsp ice water, possibly more if necessary
  • 1 cup heavy cream
  • 1/2 cup milk
  • 10 oz semi-sweet chocolate, chopped (I used chips)
  • 2 large eggs @ room temp

_DSC7808

Instructions

  • For the dough, combine flour, 3 tbsp sugar, and 1/4 tsp salt in a large mixing bowl
  • Add the butter cubes and mix (i used my hands) until you have course crumbs
  • Combine 1 egg yolk with 2 tbsp ice water and blend together
  • Make a well at the bottom of the pastry bowl and add yolk/water mix
  • Blend the yolk mix with the dough (make sure not too wet or crumbly. If it is too crumbly, add 1 tbsp ice water)
  • Form dough into disk, wrap in plastic, and refrigerate for at least 30 min
  • Roll out the dough and place in tart pan, pressing firmly into all the ridges
  • Let it relax in the refrigerator for 15 min
  • Bake in oven at 350 degrees for 30 min (recipe says to use foil and pie weights, but I didn’t and it turned out fine)
  • Take out the crust, use the egg whites to wash, and rebake for ~7-8 min (make sure it doesn’t burn)
  • While the crust cools, make the filling
  • Heat heavy cream and milk in a pot over med-low heat, until simmering
  • Remove from heat and slowly stir in the chocolate making sure that it melts evenly and smoothly
  • Evenly stir in the 2 tbsp sugar and 1/4 tsp salt
  • Whisk the 2 room temp eggs and then incorporate them into the mix
  • Pour the chocolate into the cooled tart shell
  • Bake at 325 degrees for 18-20 min until the filling sets and the surface is glossy
  • Let the tart cool and set before cutting (I had to put mine in the fridge for ~15-20 min to help it set)
  • Decorate if you’d like, or just dive right in!

IMG_2536

Roasted Brussel Sprouts with Bacon

_DSC7774

So I was at the local supermarket just browsing the produce section (that just sounds weird typing that) when I came upon a sale for brussel sprouts. This was not the first time I have seen such a sale, but this was the first time that I stopped at one. Trying to be healthier and more culinary adventurous, I decided to try my hand at them since it couldn’t be that hard right? But I knew that in order for them to be really good, I would have to combine it with bacon (obviously) so then I went to the meats section.  For my first time making these, it turned out pretty good. Definitely more enjoyable than I thought since Asian people don’t generally eat brussel sprouts I feel like.

Ingredients

  • 12-16 brussel sprouts
  • EVOO
  • Kosher Salt
  • Fresh black pepper
  • Crushed red pepper flakes
  • Few slices of bacon (who am I to judge how many you use?)
  • Shaved parmesan
  • 1 clove garlic, minced

_DSC7773

Directions

  • Preheat the oven to 400 degrees
  • Cut brussel sprouts length wise and rinse
  • In a large bowl mix the EVOO, salt, pepper, red pepper flakes, and garlic
  • Once the sprouts are dry, toss them with the EVOO and spices to evenly coat
  • Place them in the oven until tender (~20 minutes)
  • Meanwhile, fry the strips of bacon
  • After they cool, chop the bacon and toss with roasted brussel sprouts
  • Shave a few slices of Parmesan on top and enjoy!

_DSC7772