Poke Bowl

_dsc8361

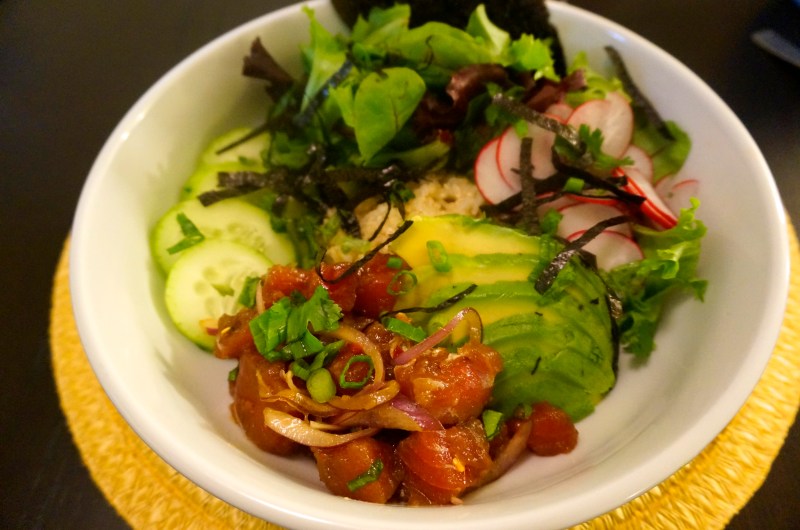
Hi everyone! Seriously, long time no talk/update, but that is most definitely on me. I keep meaning to update this thing or post something, and every time I thought about it, something came up, or I forgot, or I’m not sure really. Well as life update, I moved back to the Bay area for work and started about a month ago. It’s been crazy readjusting to life here and to the prices of everything…. But one thing I noticed was that there were TON of poke bowl places…basically Chipotle for us Asian people. So, I saw that ahi tuna was on sale at the market and decided to try and make a bowl for myself. Most of these ingredients are completely optional and you can make it however you want. It ended up being a really filling and refreshing/somewhat light meal.

Ingredients:

  • Ahi tuna, cut into small cubes
  • 1/2 red onion, thinly sliced
  • green onion, finely chopped
  • Brown rice
  • Cilantro
  • Radishes, sliced
  • Cucumber, sliced
  • Avocado, sliced
  • Lettuce (I used spring mix)
  • Nori, cut into strips
  • 1/4 cup soy sauce
  • 1 tbsp sesame oil
  • 1 tsp chili paste (to taste)

_dsc8355

Directions:

  • Mix tuna, onion, green onion, soy sauce, sesame oil, and chili paste in a bowl and let sit in the refrigerator for ~1 hour
  • In a large bowl, arrange the brown rice, radishes, cucumbers, and avocados (or whatever ingredients you are using)
  • Put some of the poke into the bowl and sprinkle with chopped cilantro and nori strips
  • Enjoy a super easy and delicious meal!


Advertisement

Nutella Chocolate Cake

_DSC8219

So back with another dessert post folks! My coworker really loves chocolate, and I mean LOVES.  She probably has it every day. The only thing she may enjoy more than chocolate is Nutella lol. So for her birthday, I decided to find a recipe for a Nutella Chocolate cake and I found a great one here.  I have not unlocked the baking achievement that allows me to make up my own stuff just yet, so I followed this one fairly closely and it turned out great. My pictures not so much because I did not put enough Nutella frosting on the inside, a big mistake both aesthetically and overall food consumption wise. However, it still tasted great and was a big success. Have fun!

_DSC8217

Ingredients:

  • 2 cups flour
  • 2 cups sugar
  • 3/4 cup cocoa powder
  • 2 tsp baking soda
  • 1 tsp salt
  • 2 eggs
  • 1 cup buttermilk
  • 1 cup vegetable oil
  • 1 1/2 tsp vanilla
  • 1 cup boiling water
 Icing
  • 1 cup butter
  • 1/2 cup shortening
  • 1 cup Nutella
  • 4-5 cups powdered sugar
  • 3-4 tbsp milk
Ganache
  • 6 oz semi-sweet chocolate chips
  • 1/2 cup heavy whipping cream

IMG_2850

Directions

  • Recipe calls for 4 8″ cake pans, but I used 3 9″ ones
  • Mix all the dry cake ingredients in a large bowl
  • Mix in eggs, buttermilk, and oil
  • Add vanilla to the boiling water and then add to the mixture
  • Pour into cake pans and bake at 300 degrees for ~25 minutes until done
  • Let cakes cool on racks
  • Make icing by beating shortening and butter till smooth
  • Add Nutella and beat till smooth
  • Add powdered sugar and milk, mix until smooth
  • Add icing to layers of the cake
  • To make the ganache, microwave whipping cream until almost boiling
  • Pour over chocolate chips in a bowl and whisk until smooth
  • Once thickened, pour over cake
  •  Pipe more icing on cake
  • Dig your face in it! or share, whatever you fancy

_DSC8213

White Chocolate Strawberry Mousse Cake

_DSC8090

Hello everyone! As I have said recently, I went on a sweet/dessert making “binge,” but because of that I have gained weight, which sucks.  Thus, I have definitely cut back on the amount of sugar I eat, but that doesn’t mean you can’t enjoy it every once in awhile. Thus, I bring you a no bake white chocolate strawberry mousse cake that I made a little while back. I got the recipe courtesy of Home Cooking Adventures. While the cake in their pictures comes out a lot prettier and even, mine still tasted good, so I’ll take solace in that lol. So indulge your sweet tooth, give it a try, and let me know how it goes!

Ingredients:

  • 9 oz crushed graham crackers
  • 6 oz melted butter
  • 7 oz white chocolate chips
  • 12 oz whipping cream
  • 1/2 tbsp gelatin powder
  • 2 tbsp cold water
  • 10 oz strawberries, hulled
  • 1/4 cup sugar
  • 1/2 tbsp gelatin powder
  • 2 tbsp cold water
  • 7 oz whipping cream
  • Fresh sliced strawberries, for decoration

_DSC8088

Directions:

  • Cut the 7 oz strawberries and place in a small saucepan with sugar over medium heat until sugar dissolves
  • Pour into a blender and puree
  • Dissolve 1/2 tbsp gelatin in 2 tbsp cold water and let it swell ~5min
  • Place gelatin in saucepan over low heat until it dissolves and then mix into strawberry puree
  • Let sauce cool to room temp
  • Place graham crackers into food processor and pulse until you have crumbs
  • Add the melted butter and process until fully combined
  • Push the crust into the bottom of a 8-9″ springform pan until covered
  • Refrigerate until needed
  • Dissolve gelatin in water and let swell for ~5 minutes
  • Add chocolate and 5 oz whipping cream and melt with double boiler
  • Again place swelled gelatin over low heat until dissolved and pour into white chocolate mixture and let cool
  • Whip the other 7 oz of whipping cream to stiff peaks and mix in the white chocolate mixture until well combined
  • Pour the chocolate mousse over the crust and refrigerate for ~20 min to let set
  • Whip the 7 oz whipping cream to stiff peaks and add the strawberry mixture until well combined
  • Pour over the set white chocolate mixture
  • Refrigerate 4 hours to overnight before serving
  • Use a knife (warm) to run around the edge of the pan before springing it open, then slice it up and go to town!

_DSC8089

Mini Beef Wellingtons

_DSC8189

Hi everyone. Today I bring to you beef wellingtons, kind of. You see, the idea of a beef wellington (filet wrapped in pastry dough) is basically all kinds of amazing. I mean what’s not to like? Meat and pastries. So I have always thought about making beef wellingtons because they are so good, but the problem I always run into is that I don’t like mushrooms….like at all. They are some of my least favorite foods and are a key ingredient in this dish. Also, I didn’t want to make big ones as a main dish. Not sure why, but I was feeling the appetizer route. That led me to this recipe, which still included mushrooms, but I decided to change those out. I replaced the mushrooms with grilled onions and they turned out amazing. Obviously if you are a traditionalist, or a mushroom lover, go for the original, but the onions as a substitute worked just as well in my opinion.

_DSC8181

Ingredients:

  • 1 tablespoon extra virgin olive oil
  • 1 yellow onion, thinly sliced
  • 1 teaspoon finely chopped fresh rosemary (can use dried)
  • 1/4 teaspoon freshly ground black pepper
  • Sea salt
  • 1 large egg, lightly beaten
  • 1 16oz package frozen puff pastry dough, thawed
  • 1 lb trimmed beef tenderloin, cut into 24 cubes (about 3/4 inch each)
  • 1/3 cup Boursin cheese (I found a Boursin cheese with herbs at the market)

Directions

  • In a skillet over medium heat, sauté onions (or mushrooms) with rosemary, salt and pepper until cooked
  • Roll puff pastry out and cut into 3 in. squares (mine ended up being more triangles due to the way the dough was shaped)
  • Place one beef cube in the middle of the pastry square and add a pinch of salt
  • Top each cube with some cheese and some onions (or mushrooms)
  • Brush the edges of the square with egg wash and fold the dough over the cube to seal it
  • After you’ve completed this with all of the cubes, place them on a parchment lined baking sheet and brush the tops with the egg wash (I found it easier to just dunk and roll them in the egg wash)
  • Bake for ~9 minutes at 450 degrees, until the pastry is golden brown
  • Let sit for ~5 minutes and serve!

_DSC8183

Chocolate Strawberry Cake

_DSC8039

So now that I have been baking a lot recently, I have been tasked with making cakes for my family’s birthdays.  We celebrated my sister’s birthday recently and she requested a chocolate cake, but one that incorporated strawberries somehow.  I think its safe to say that we all have a thing for strawberries. So I scoured the internet for recipes because I am not yet at the point of winging cakes, especially not for a birthday… That’s when I came across this cake from a Taste of Home.  It turned out really well. Rich and moist,  a little too much chocolate for my taste, but everyone else seemed to love it. Enjoy

_DSC8046

Ingredients:

  • 1 package chocolate cake mix (regular size)
  • 1 package (3.9 ounces) instant chocolate pudding mix
  • 4 eggs
  • 1 cup (8 ounces) sour cream
  • 3/4 cup water
  • 1/4 cup canola oil
  • 4 ounces semisweet chocolate, melted
  • FROSTING:
  • 2 cups butter, softened
  • 4 cups confectioners’ sugar
  • 3/4 cup baking cocoa
  • 1/2 cup 2% milk
  • GARNISHES:
  • 2 ounces semisweet chocolate, melted
  • 1 pound fresh strawberries, hulled
  • GANACHE:
  • 4 ounces semisweet chocolate, chopped
  • 1/2 cup heavy whipping cream

_DSC8044

Instructions

  • Grease 2 9″ cake pans
  • Combine all the cake ingredients in a large bowl and beat on low for 30 seconds, then for 2 minutes at medium speed
  • Pour evenly into 2 pans
  • Bake at 350 degrees for ~30 minutes until done (toothpick comes out clean)
  • While cake is cooling, make the frosting
  • Beat the butter, sugar, and cocoa until fluffy, then add milk in and continue to mix until smooth
  • Spread the frosting inbetween and around the cooled cake
  • For the ganache, heat the whipping cream over medium heat or in the microwave
  • Then mix in the chocolate and stir until melted and smooth
  • Pour over the cake and arrange strawberries as desired
  • I also used extra frosting to pipe designs onto the cake if that is something that interests you
  • Cut, eat, and celebrate!

_DSC8061

Panko Parmesan Crusted Halibut

_DSC7794

So Jenn was over one weekend and I decided to cook for her (as is kind of the point of this blog). She obviously gets the better end of this deal now that I think about it. She is always wanting to eat healthier and encouraging me to do the same. I oblige as much as I can, but c’mon, you can’t not eat ribs, burgers, fries, steak, pizza, dessert, etc if they’re in front of you. And let’s be honest, I make it a point to put them in front of me. So, I had a few vegetables in my fridge and in order to be healthy, I decided to make fish. But me being me and wanting to make it nice and do this “chivalrous” thing for the gf, I went out and got halibut (Costco really does have good deals). I basically had everything else in my pantry, so it worked out great. I loosely followed a recipe by For the Love of Cooking. All in all, it turned out pretty dang good, crispy and flaky, the way it was supposed to be. Try it out and let me know what you think!

_DSC7792

Ingredients:

  • halibut filets, no skin
  • 1/2-3/4 cup panko crumbs
  • 1/4 cup freshly grated parmesan cheese
  • 1 tbsp parsley, finely chopped (or dried I suppose)
  • 1/2 tsp garlic powder
  • salt and pepper
  • lemon juice (maybe 1/2 a medium lemon)
  • olive oil
  • cooking spray

Directions:

  • Preheat the oven to 450 degrees, wash and pat dry the halibut
  • On a plate, combine the panko, parmesan, parsley, and garlic powder
  • Brush both sides of the halibut with olive oil, and squeeze some lemon juice on them
  • Season the halibut with salt and pepper
  • Dip and coat the halibut with the panko mixture
  • Place the halibut on a cooking/baking rack and spray with cooking oil
  • Bake for ~15 minutes
  • Let sit for ~1-2 minutes, garnish with some chopped parsley and enjoy!

_DSC7798

Raspberry Mousse Cake

_DSC7809

So for a birthday a little bit ago (and recently Christmas) I decided to make a Raspberry Mousse cake.  I have been kind of on a dessert making binge recently, which seriously needs to stop as I have put on a few pounds. Never in my life have I eaten this much sugar/sweets/desserts as I have in the past few months. I usually don’t like chocolate and eat it maybe once or twice a year, but I’ve had it like weekly in the past 4 months. Craziness. Anyways, I made this cake once for a birthday and as I was showing my little cousin my recent baking exploits, she said she wanted one when we got together for Christmas. This girl is super picky and she really doesn’t eat anything, so I decided why the heck not. Let’s do it. So I ended up making it again and she just took the whole thing home because she didn’t want to share it with the family (smart girl lol). This is really a mix and match of 2 recipes, 1 being a basic chocolate cake, and the other the raspberry mousse that I got from Natasha’s Kitchen. Thanks Natasha!

Ingredients for Cake:

  • 1 3/4 cups all purpose flour
  • 2 cups sugar
  • 3/4 cup unsweetened cocoa
  • 1 1/2 tsp baking soda
  • 1 1/2 tsp baking powder
  • 1 tsp salt
  • 2 eggs
  • 1 cup milk
  • 1/2 cup vegetable oil
  • 1 tsp vanilla
  • 1 cup boiling water

Ingredients for Mousse:

  • 1 1/4 cup fresh or frozen raspberries
  • 1/4 cup sugar
  • 1 Tbsp fresh lemon juice
  • 1/2 Tbsp Knox Unflavored Gelatin
  • 1 cup heavy whipping cream
  • 1 1/2 Tbsp confectioners (powdered) sugar

_DSC7811

Instructions:

  • For the cake, preheat the oven to 350 degrees and butter 2″ cake pans
  • In a bowl, combine and mix flour, sugar, cocoa, baking soda, baking powder, and salt
  • In a small bowl, beat and mix  eggs, milk, oil, and vanilla
  • Slowly add boiling water and mix well
  • Add wet ingredients to dry, fold and stir until smooth and well combined
  • Pour batter and divide between 2 pans, bake for 30-35 minutes
  • Remove the cakes and let cool on racks
  • For the mousse, combine the raspberries and sugar in a small saucepan over low-medium heat
  • Whisk together until a sauce then remove from heat and strain through a fine mesh sieve, extracting as much juice as possible (may need to push on the sauce using a spoon)
  • Pour the juice back in the pan and whisk lemon juice and gelatin, heating the sauce until the gelatin dissolves
  • Refrigerate sauce until it is room temperature (be careful to not over refrigerate as the sauce sets quick)
  • Whip heavy cream to soft peaks and add confectioners sugar, then continue whipping to stiff peaks
  • Pour room temp raspberry sauce into whipped cream and fold the sauce in
  • Spread the mousse over the cake and refrigerate for 2 hours up to overnight
  • Decorate with whipped cream and raspberries and serve!

Baked Chicken with Cherry Tomatoes

_DSC7790

Fall is almost over, and we are headed into winter, but before we do, this is a really Fall dish I made.  It is really simple and doesn’t take that much time to be honest.  I think I have said this before, but I like chicken thighs because they are easy to bake and are more juicy and tender (not a breast fan). Also, I am kind of a sucker for the skin. I got the recipe just randomly browsing sites (not even really sure how I got there). In the end, I definitely enjoyed this one, but next time I probably won’t use as many cherry tomatoes, as it can get kind of pricey the more you use.

_DSC7776

Ingredients

  • 2 pounds bone-in, skin-on chicken thighs
  • 1/2 teaspoon kosher salt
  • 2 cups of cherry tomatoes
  • 6 whole cloves garlic, peeled
  • 1 1/2 Tbsp balsamic vinegar
  • 1 1/2 teaspoons olive oil
  • 2 sprigs fresh rosemary

_DSC7778

Instructions

  • Sprinkle both sides of the thighs with salt and place in baking pan with some space in-between each thigh, skin side up
  • Cut the tomatoes in half and mix in a bowl with garlic, olive oil, and balsamic vinegar
  • Pour the tomatoes over the chicken pieces and arrange them so they fill the gaps between the thighs
  • Lay sprigs of rosemary over the tomatoes
  • Bake at 350 degrees for ~45 minutes
  • Skim excess fat/oil and serve with whatever you feel like
 _DSC7783

Chocolate Tart with Raspberries

_DSC7805

At work we had a going away party for one of my supervisors who is moving on to bigger and better things (sad day). She wanted the link to this blog, and I gave it to her, so maybe she will see this.  If so, HI! Now she is a big desserts person, so my colleagues and I decided to make a few desserts for her. Of course my colleagues are big chocolate people and so is my supervisor. Now you know that I am not the biggest chocolate fan, but I sucked it up and made this anyways. I found it scrolling through my food network app on the way to the market and was able to find everything I need. Turns out its not THAT complicated and it tasted pretty good too for a guy who isn’t big on chocolate. The recipe worked out well, but I also thought I would decorate it more with some vanilla buttercream frosting and topped it with raspberries to complete it.

_DSC7806

Ingredients:

  • 2 cups all purpose flour
  • 5 tbsp sugar, separated
  • 1/2 tsp salt, separated
  • 3/4 cup unsalted butter, cold, cut into small cubes
  • 1 large egg, separated
  • 2 tbsp ice water, possibly more if necessary
  • 1 cup heavy cream
  • 1/2 cup milk
  • 10 oz semi-sweet chocolate, chopped (I used chips)
  • 2 large eggs @ room temp

_DSC7808

Instructions

  • For the dough, combine flour, 3 tbsp sugar, and 1/4 tsp salt in a large mixing bowl
  • Add the butter cubes and mix (i used my hands) until you have course crumbs
  • Combine 1 egg yolk with 2 tbsp ice water and blend together
  • Make a well at the bottom of the pastry bowl and add yolk/water mix
  • Blend the yolk mix with the dough (make sure not too wet or crumbly. If it is too crumbly, add 1 tbsp ice water)
  • Form dough into disk, wrap in plastic, and refrigerate for at least 30 min
  • Roll out the dough and place in tart pan, pressing firmly into all the ridges
  • Let it relax in the refrigerator for 15 min
  • Bake in oven at 350 degrees for 30 min (recipe says to use foil and pie weights, but I didn’t and it turned out fine)
  • Take out the crust, use the egg whites to wash, and rebake for ~7-8 min (make sure it doesn’t burn)
  • While the crust cools, make the filling
  • Heat heavy cream and milk in a pot over med-low heat, until simmering
  • Remove from heat and slowly stir in the chocolate making sure that it melts evenly and smoothly
  • Evenly stir in the 2 tbsp sugar and 1/4 tsp salt
  • Whisk the 2 room temp eggs and then incorporate them into the mix
  • Pour the chocolate into the cooled tart shell
  • Bake at 325 degrees for 18-20 min until the filling sets and the surface is glossy
  • Let the tart cool and set before cutting (I had to put mine in the fridge for ~15-20 min to help it set)
  • Decorate if you’d like, or just dive right in!

IMG_2536

Roasted Brussel Sprouts with Bacon

_DSC7774

So I was at the local supermarket just browsing the produce section (that just sounds weird typing that) when I came upon a sale for brussel sprouts. This was not the first time I have seen such a sale, but this was the first time that I stopped at one. Trying to be healthier and more culinary adventurous, I decided to try my hand at them since it couldn’t be that hard right? But I knew that in order for them to be really good, I would have to combine it with bacon (obviously) so then I went to the meats section.  For my first time making these, it turned out pretty good. Definitely more enjoyable than I thought since Asian people don’t generally eat brussel sprouts I feel like.

Ingredients

  • 12-16 brussel sprouts
  • EVOO
  • Kosher Salt
  • Fresh black pepper
  • Crushed red pepper flakes
  • Few slices of bacon (who am I to judge how many you use?)
  • Shaved parmesan
  • 1 clove garlic, minced

_DSC7773

Directions

  • Preheat the oven to 400 degrees
  • Cut brussel sprouts length wise and rinse
  • In a large bowl mix the EVOO, salt, pepper, red pepper flakes, and garlic
  • Once the sprouts are dry, toss them with the EVOO and spices to evenly coat
  • Place them in the oven until tender (~20 minutes)
  • Meanwhile, fry the strips of bacon
  • After they cool, chop the bacon and toss with roasted brussel sprouts
  • Shave a few slices of Parmesan on top and enjoy!

_DSC7772